Thursday, May 26, 2016

Downtime = Upcycling

I have spent much of the last two weeks scrambling about as we prepare for our son's high school graduation. We have out of town family coming. We are cleaning the house top to bottom (or at least attempting to do so.) And we still have our normal lives with work, end of school projects, and now college registration.
There haven't been many moments to catch a breath.
But crafting must go on!
Last week my preschooler helped me turn a garbage bag of tshirts that had been headed to the dump into tarn. (Definition: tarn is upcycled tshirt yarn)
Mommy! That's a big ball of yarn!
I then turned the tarn into some bracelets.

I used the opportunity to have some great starter conversations with her about recycling and taking care of the Earth.
This started a spree through the house to find more tshirts. But when she brought this one to me I saw more potential than cutting it into tarn.

I had found this great free tutorial from Nap-Time Creations.
And we turned an old unwanted tshirt into these:


I love finding new life in old projects!
And I'm loving the process of learning new crafting skills as I go.
Go, be creative, and give new life to something in your house. And share your pictures. I would be thrilled to see them.

Wednesday, May 11, 2016

Spring Means New Skorts!

One thing that I dread each new season with 4 children is the need for new clothes. Shopping for a family of 6 can add up very quickly! So when I'm able to go through my stash and whip up a new outfit that one of my children love it's a great day!


Take this cuteness of a scrap of fabric I found in my stash and combine it with this fantastic skort pattern  on Peekaboo Patterns and you get a very happy mommy and an ecstatic Audrey.


The pattern was super simple and her tutorial pictures are easy to follow. 


I don't work with knits very often, mainly because my sewing machine doesn't seem to like them. But I found this perfectly coordinating piece of pink knit in a bag of scraps someone had given me. I'm super pleased with how the shorts look!


I will admit that my seam allowance was slightly off on attaching the waistband. I needed a smaller width elastic than called for.


The shirt is also from some knit scrap I had. I didn't use a pattern. I drafted my one from a tshirt Audrey wears often. I also added a slight flutter sleeve.


And of course every photo shoot ends with at least one silly picture.


Now time to get back to work designing and filling custom orders. 

But I might need to take another break and make a few more of these skorts for my girly girl tomboy!


Monday, May 9, 2016

Updates from the Wonderful World of AmamammaDesigns

                   
You have not known the meaning of the word tired until you are craft show tired. 
              
             
The month of April was a whirlwind of shows, custom orders, and family life.  

The month of May I am taking some time back from shows because y oldest child is graduating high school! My baby boy is a senior. May now involves extra activities as he concludes his high school career.
                   
But never fear! I am still working up a storm. My Etsy shop is being restocked with new items added weekly. 
        
I am in the process of a top secret project using these wonderful materials.  (More shall be revealed later)
     
And I am designing away. Currently I am working on a child's swimsuit coverup. Crochet peeps be on the lookout for a pattern testing call at the end of the month.

As always I am still taking a limited amount of custom orders.

Pshew!!!!! For someone taking a break I sound rather busy don't I? 
That's the crafter's life! And I'm loving it!
                       

Sunday, April 17, 2016

Notes to Self - Craft Show Edition


The weather is warming up and that means it is time for outdoor craft shows. I just participated in my first show of the season yesterday. So today I thought I would share a few of the random thoughts that flew through my mind as I worked yesterday.

  • Setup wasn't as difficult as I thought it would be, but did I bring enough product?
  • Give the 4 year old some breakfast....a muffin and chocolate milk for a treat might bribe her to be good.
  • Slow start, glad I brought a few small UFOs....maybe I can beef up the product offering on the tables
  • 4 year olds get bored very quickly.....I wonder why she is so antsy this morning
  • Yay!!!!! Customer!!!!!!
  • 4 year olds invent potty emergencies just for a change of scenery
  • Did I bring sunscreen? No.....I guess I need to stand facing the booth for awhile.
  • Bright sunshine + late night + early morning start + sugar loaded breakfast = cranky 4 year old
  • Halfway point! "Mommy, can we go home?"
  •  "Mommy, they're buying without giving you money!" "No sweetheart, they're just looking to see what they want to buy!"
  • Mommy, I'm super sweaty! Can't we go sit in the car?"


As you can see it was a very interesting day. Thank you to all my customers who thought Audrey was cute. It was a long day for her but you made it fun for her. And if you are local to us look for us at a craft show near you!

Tuesday, February 23, 2016

Adventures with Audrey: Making Crayons

One of the great blessings of working from home is that I make my own schedule.  That allows me to spend lots of time with this cutie!


She is always asking me if she can help make stuff too!  Today was her day!

Her older sister had made these owl shaped crayons for a few close friends as part of a Valentine’s gift.  And Audrey was very jealous that she didn’t get to help.  So this morning on our way home from taking the big kids to school I ran into the dollar store and picked up some crayons.

She was so excited to do crafts with Mommy!  
And determined to peel the paper off the crayons all by herself.


And break the crayons into pieces!


I had planned to make solid colors but that quickly changed.


The wait for the crayons to melt while in the oven was tortuous.


But the wait for them to cool was worse.


So bad in fact that Audrey rummaged through the cabinet to find a mini muffin pan.  She decided she wanted circle crayons too!


The finished result was a lot of crayons!


But the process was great!  We spent time talking, just the two of us (with no older sibling interruptions).  And we talked about colors.

Audrey says this one looks like a planet.


I think this one looks like a piece of chocolate.


And these look like tie-dye!


If you want to make your own shaped crayons at home it is super easy.

Materials:
Crayons (you can either buy a pack at the dollar store or use up those broken pieces you already have laying around the house)
A non-stick muffin pan to melt the crayons
An oven

Directions:
Preheat oven to 250 F.
Peel paper from crayons.
Break into pieces and place in the muffin pan.
Place pan in preheated oven.
Set timer for 20 minutes. (It may take a few minutes more or less depending on your oven.)


Let crayons cool completely. (about 30 minutes is usually enough)


Flip over pan and crayons should fall out.

Audrey says coloring is fun, but it is even better when you make them yourself!


Friday, February 5, 2016

Adapting Your Favorite Pattern Is Easier Than You Think

Sometimes I love being able to create cute things for my kids!

The project shown used Caron Simply Soft in the colors Watermelon, Black, and Gray Heather.  It was knit using US size 6 (4.00 mm)  16” circular needles and US size 6 (4.00 mm) DPNs.

This tunic/dress is absolutely adorable on Little Bit and it was so easy.

Often I get people who ask me what pattern I used and I’m glad to share. But I have no pattern for this.  I just pieced it together as I knit.


So I thought this would be a perfect opportunity to talk about how easy it can be to alter your favorite patterns to fit your needs.

Quite honestly when I began this project I had planned to just do a basic raglan sweater, but as it began to take shape I just wanted something different.

I used a basic raglan sweater pattern to start this tunic.  I just went to Ravelry and searched for a top down raglan pattern knit in the round.  There are a ton to choose from!!!!
I chose one with a rolled collar and hem because I just liked the look.


I also knew I wanted to do stripes because I was working out of my stash and didn’t have enough of any one color to complete the project. After I knit the collar I knit the first stripe until it was about 1 1/2 inches. Then I counted my rows and used that number as my stripe repeat.
(I ended up using 8 rows asmy repeat.)


Now remember I had planned to do a sweater but when it was shirt length I didn’t care for it all that much.  Rather than frog the whole project I decided to just keep knitting to tunic length.  I ended up doing a couple extra stripes after I reached the length I thought I wanted because I am a little OCD when it comes to the stripe pattern. I knew I wanted the rolled hem to be in black like the collar.  But the extra length turned out to be perfect and gives her a little growing room.
(After you’ve spent the time and energy creating that special gift, you hope they can wear it for awhile!)


I also decided that I didn’t want to do the long sleeves that I had originally planned so I finished the stripe pattern to black for a rolled hem.  It is the perfect edging!

If you have a go to pattern that you use for a sweater, try these adaptations for it.  Or better yet try your own!  And share pictures of your projects with me!  I would love to feature some of your projects on the blog!


The above post is not meant to be a pattern but simply a description of my process.  But I do ask that if you share the ideas with your friends, etc that you refer them to my blog.  Thanks!

Wednesday, January 27, 2016

A Study in Color.....

Wow!  That post title sounds rather academic doesn’t it?

I promise today’s post is definitely not academic.  Instead it is just a few thoughts that have come to me as I look through the pictures of projects I have posted on this blog.

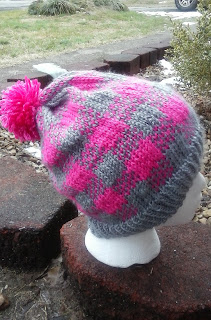
Two days ago someone posted pictures of her newest knitting addiction in a Facebook group I follow.  It was the Mad For Plaid hat pattern.  It is a paid pattern on Ravelry and can be found here.
(I do not know the designer and am linking to her pattern for reference. But I do love the pattern!)


I immediately purchased the pattern (not something I often do) and cast on my first one.

This morning I finished my second.


As I was knitting the second I noticed how different it looked from the first one.  I even double checked the pattern and the chart numerous times to make sure I was knitting it properly.  
I was.

So what made the difference?

The color made the difference.  The first one was bold and somewhat earthy.  It reminds me of the lumberjack trend that has been all the rage.   But the second one is soft and almost hazy. 

I have noticed on some of my own designs a similar occurrence as I knit samples.  For example take a look at my Swirly Leaves Beanie.


The leaves and swirls are knitted with the same yarn in both samples, but the difference in the black versus the tan background yarn  is amazing.


 Then I took a look back at my Rooster Beanie.


I originally knitted the Rooster design as a mascot beanie for my children’s school.  But I had so many people ask me for a pattern that I knitted up samples in other colors as I was editing my pattern notes.


Here’s a look at the back side of the Rooster beanie.


The red and black is a bold statement while the other more muted colors are soothing.

I’m not always sure of my color combinations as I’m designing.  But I’m even more hesitant to venture far from another designer’s sample colors.  But after my photo journey down knitting memory lane, I feel much more confident about choosing colors.  My advice to you would be to just jump in and try it.  Keep in mind the boldness of contrast versus the soothing complimentary colors when choosing your yarns. Take pictures!  And date them if possible. It’s always great to look back at your creations for inspiration, even years after they’ve been gifted. I think the next time you flip through those pictures looking for a muse, you will discover that your color choices correspond with your moods.

And if you are searching for my published patterns you can find them all on my Ravelry page.

Thanks for looking!